Forking the Hummingbot Repository on GitHub
Forking a repository is a simple process that allows you to propose changes to the original repository. In this guide, we will walk you through the process of forking the Hummingbot repository on GitHub.
About Forks
A fork is a new repository that shares code and visibility settings with the original upstream repository. Forks are often used to iterate on ideas or changes before they are proposed back to the upstream repository, such as in open source projects or when a user does not have write access to the upstream repository.
You can use forks to propose changes related to fixing a bug. Rather than logging an issue for a bug you have found, you can:
- Fork the repository.
- Make the fix.
- Submit a pull request
Prerequisites
If you haven't yet, first set up Git and authentication with GitHub.com from Git. For more information, see "Set up Git."
Forking the Hummingbot Repository
- On GitHub.com, navigate to the Hummingbot repository.
- In the top-right corner of the page, click Fork.

-
Under Owner," select the dropdown menu and click an owner for the forked repository.

-
By default, forks are named the same as their upstream repositories. Optionally, to further distinguish your fork, in the Repository name field, type a name.
- Optionally, in the Description field, type a description of your fork.
- Optionally, select Copy the DEFAULT branch only. For many forking scenarios, such as contributing to open-source projects, you only need to copy the default branch. If you do not select this option, all branches will be copied into the new fork.
- Click Create fork
Note: If you want to copy additional branches from the upstream repository, you can do so from the Branches page. For more information, see "Creating and deleting branches within your repository."
Cloning Your Forked Repository
Now, you have a fork of the Hummingbot repository, but you do not have the files in that repository locally on your computer.
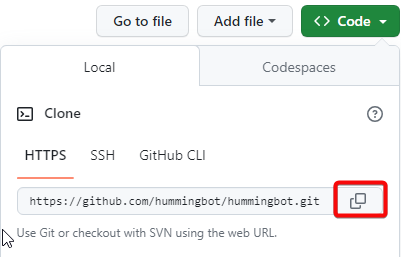
- On GitHub.com, navigate to your fork of the Hummingbot repository.
- Above the list of files, click Code.

- Copy the URL for the repository.
- Under "HTTPS", click the copy icon
- Open Terminal.
- Change the current working directory to the location where you want the cloned directory.
- Type
git clone, and then paste the URL you copied earlier. It will look like this, with your GitHub username instead ofYOUR-USERNAME:
- Press Enter. Your local clone will be created.
$ git clone https://github.com/YOUR-USERNAME/hummingbot
> Cloning into `hummingbot`...
> remote: Counting objects: 10, done.
> remote: Compressing objects: 100% (8/8), done.
> remote: Total 10 (delta 1), reused 10 (delta 1)
> Unpacking objects: 100% (10/10), done.
Making Changes to the Local Branch
- Navigate to the local directory of the cloned repository.
-
Create a new branch using the following command:
-
Switch to your new branch:
-
Make changes to the project coe using your preferred IDE editor (VSCode / Pycharm etc).
-
After making changes to the code you'll need to stage your changes:
-
Commit your changes:
-
Push your changes to your fork:
Opening a Pull Request
- Navigate to the Github link where you created your fork.
-
Above the list of files, click Compare & pull request to create a pull request for the associated branch.

-
On the page to create a new pull request, click compare across forks.

-
In the "base branch" dropdown menu, select the
development branch. We strongly recommend users point to thedevelopment branchfor contributions
-
In the "head fork" dropdown menu, select your fork, then use the "compare branch" drop-down menu to select the branch you made your changes in.

-
Type a title and description for your pull request.
- If you want to allow anyone with push access to the upstream repository to make changes to your pull request, select Allow edits from maintainers.
-
Click Create Pull Request.

Congratulations! You have now created a pull request with your changes.